Installing on Windows#
Installing the Applications#
For information about supported OS versions and recommended system memory, please see Supported Platforms and Configurations.
Installing#
Download the Windows Setup for 64-bit. Run the Setup file and follow the screens as it takes you through the installation. After the installation is complete, you can run Lattix from the icon on the desktop. In order to uninstall, simply run the menu item.
Note
If you are installing a new version of Lattix and you already have an older version installed, you do not need to uninstall the older version.
Alternative Installation#
Alternately, download the Archive file and simply unzip to extract the file
anywhere on your file system. In order to run Lattix you must run lattixarchitect.exe
from the bin directory in the Lattix installation. To uninstall, run Uninstall.exe
in the Lattix installation directory.
Specify License#
Run Lattix. If you have no license the License dialog will come up. Alternately, you can bring up the License dialog from . Click on Read License File and select the license file that was provided by your Lattix supplier. You are now ready to use Lattix.
Increasing Java heap memory#
You may need to increase the max Java heap memory when loading large projects.
You can do this within Lattix Architect:
Go to
Set the value, e.g. to 16000. See Supported Platforms and Configurations for recommended values.
Press OK and then restart Lattix
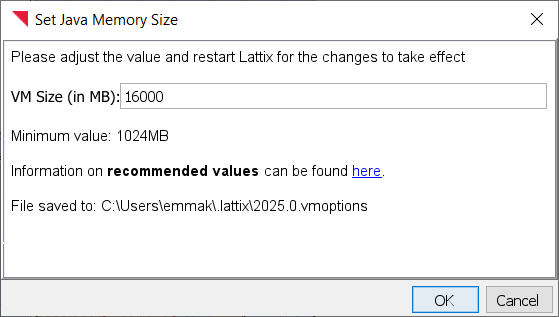
Note
The new value will not be used until you have manually restarted Lattix.
Installing the Repository#
Install:
Download the setup file for Windows. Run the setup and follow the steps. A Tomcat server and the Lattix web application will be installed on your PC. Please note that running Lattix Web is not supported on a server that has another Tomcat server running on it.
If you are installing a new version of the Repository, you must first uninstall the older version. The uninstall will leave the data directory unchanged. The new version will then read the old data directory and your current data will be preserved.
Access the Lattix Web Repository in a browser. If you installed Lattix Web on a remote server go to: http://hostname:8080/LattixWeb (replace “hostname” with the name of your remote host) or if you installed Lattix Web on your personal machine http://localhost:8080/LattixWeb
You will get to a screen that asked you to update your license, click to update the license, login as the admin (by default username: adminpassword: admin)
If you have not received a LattixWeb license yet, email the HostIDs to support@lattix.com and you will be sent the correct license file. Once you receive the license file, click “set license file” and load in the Lattix Web license file. The status of the license should not be “Valid”
Now add a user by clicking “here” in the blue bar at the top of the page
You can now log in as the user and start using Lattix web
Increasing Memory for Lattix Web service#
Run the executable c:\<LattixWebInstall>\bin\LattixWeb2025w.exe which will open a window
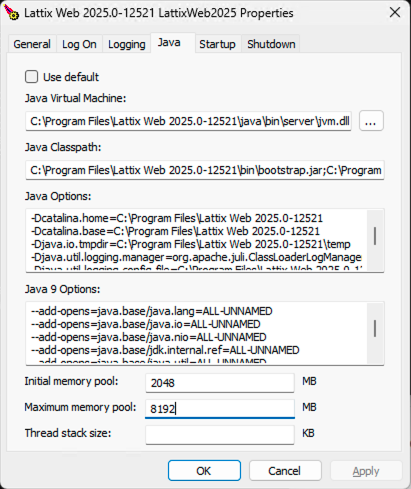
Click on the “Java” tab and change the “Maximum Memory Pool” to the desired number.
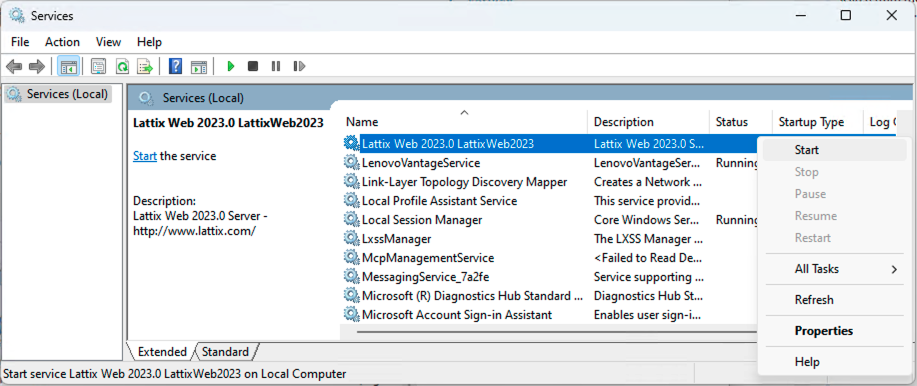
Starting/Stopping the Lattix Web service#
First you need to open the Services Control panel. This can be done in several ways: 1. Search for “services” in the Windows search bar, select the “Services” App 2. Select “Run” and enter the text “services.msc”
Once the Services App is open, scroll down and select the service “Lattix Web <Version> LattixWeb<Version>”. You can right click on the service and select “Start” to start the service and “Stop” to stop the service.