C/C++ with Clang using Visual Studio#
Visual Studio solution and project files contain all the compile and link information needed for processing the source code. Lattix can read these file to create a project.
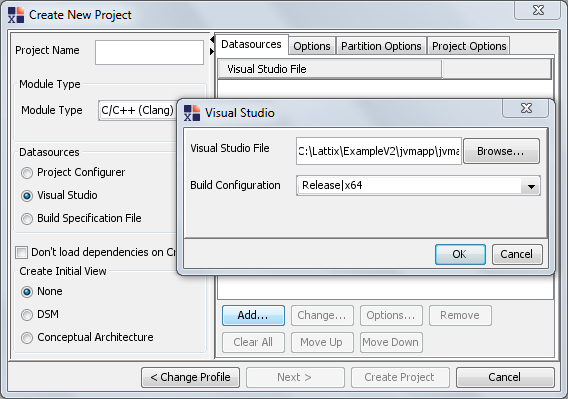
Creating a project#
Select New Project from the File menu
Select either Embedded or All on the Profiles page and click Next
Select C/C++ (Clang) in the Module Type dropdown
Set Datasources to Visual Studio
Press Add… and navigate to your .sln file
Choose the Build Configuration to use for your project
Click on Create Project
The resulting Lattix project will have a Unit (i.e. datasource) for each studio project contained in the .sln file.
Create Project with command line LDCUpdate#
ldcupdate project.ldz -module:clang vs-sln-file:sln_name=solutionfile.sln,sln_cfg=Debug|x64
vs-sln-file specifies that the datasource is a solution file.
sln_name is the file name
sln_cfg is the build configuration to use
Check for Errors#
It is important after creating the project to check for errors that might have occurred as this could affect the results (dependencies shown). Check for errors by bringing up the Clang Reports using Reports->Clang Reports…->Diagnostics by File. Please pay particular attention to fatal errors, which are typically caused by missing include files. Most other errors will normally not have any significant effect on the analysis. Fix the errors and re-create (or update) the project.
Hint 1: To minimize the time, remember that you can test by compiling just a single source file that is giving you errors. The Options tab on the Create New Project dialog has an section called Include files matching these names. Simple enter the full path name of the file and then only that file will be compiled.
Hint 2: You can specify any additional include directories in the Options tab on the Create New Project dialog using the section Include directories. You can also specify any additional compiler options using the Compiler Options section.
Hint 3: If any run across errors such as undefined types such as char16_t, char32_t, int16_t etc, these are C++11 standard types. You can enable the C++11 standard types by specifying the option -fms-compatibility-version=19 in Compiler Options. This is no longer needed in versions 10.1.2+, as this option is always enabled.
Hint 4: For Visual Studio 2010 based projects, if you run across errors such as fatal error: ‘SDKDDKVer.h’ file not found please add the include directory C:Program Files(x86)Microsoft SDKsWindowsv7.0AInclude. The path may have to be adjusted based on your installation