Managing Lattix Architect Projects#
Open a Project#
You can open a saved project through File –> Open or from Open in the Welcome dialog box. Note that you do not need the source files that were used to create the Project. A project file can be freely shared between users. It should normally be checked into your source code control system and managed like any other project artifact. It can also be stored in the Lattix Web repository as a Snapshot in a Project.
Update a Project#
You can update a project to load in new data into an existing model. The partitioning and rules are preserved but the underlying data is updated with new sources of data. You can also use update to change project specific options.
Update is done either through Lattix Architect or through LDC (command line). Update generates a report on the changes to the project and on architectural rule violations. When used through LDC, update is typically used at build time to ensure that new changes preserve the specified architecture. The report is also useful to see what changes have been made from the previous to the current build.
How to Update a Project#
In order to update a project in Lattix Architect, simply select Project –> Project Update.
In order to change project properties in Lattix Architect such as loading in data from a different source or changing other properties, bring up Project –> Project Properties.
To update using a command line, please read the command line options for LDCUpdate here.
Update Options#
Discard Current Partitions#
This option will discard all your edits or changes and recreate the project. It is a very useful option, when you change the properties of a project and want to force the project to be repartitioned. If you do not select an Input set to be updated, Update will simply take the current set of atoms and repartition them without actually reading the input all over again.
Display Report#
You can turn on/off the generation of the report. Since report generation is a memory intensive operation, turning this option off can reduce memory utilization during update.
Produce Detailed Report#
This option is for projects created with the Atom Database enabled. The option generates a report which identifies all the new and changed elements down to the member level even if atoms in the project have not been member level expanded.
Create a Compound Project#
Compound projects allow a user to aggregate multiple sub-projects together into a single project. Earlier implementations of compound projects were primarily “view only”. The new implementation of compound projects became available from Lattix 9.5 onwards.
This new implementation allows a compound project to behave like a regular project. There are options to handle duplicate atoms. Atoms and dependency mapping also works correctly. Since a compound project looks just like a regular project that may have been created with all the data sources of the sub-projects, it makes it possible to split up the creation of large projects into smaller sub-projects. Compound projects can also be used to combine projects created with different technologies such as C/C++ and Java, or even to combine projects created for different versions of a system.
To read a product brief on Compound Projects, please contact us at support@lattix.com
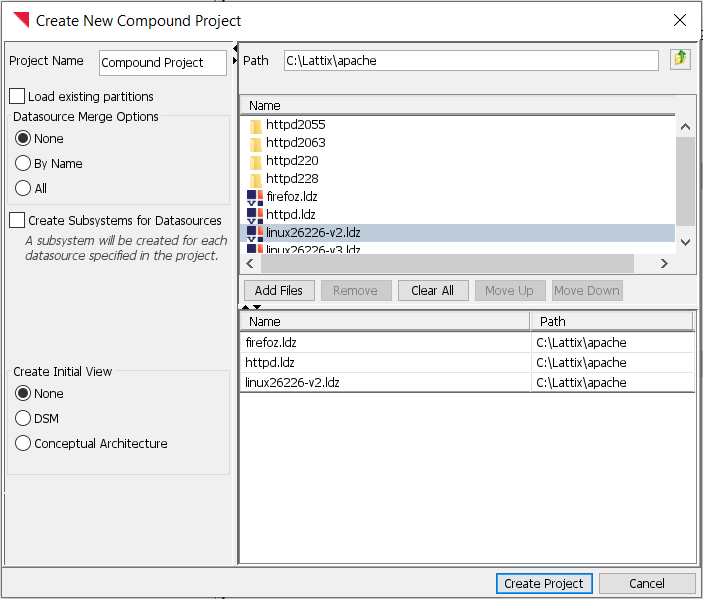
In order to create a new project, select File –> New Compound Project from the Menu Bar.

Specify the project name in the Project Name field.
Select an option to specify how the datasources of the sub-projects will be merged together:
None: The datasources of each sub-project become the datasources for the compound project.
By Name: Datasources with the same name are merged together to create a new datasource with that name. The atoms within this datasource are created by merging the atoms from the individual data sources. For atoms with the same name, a new atom with that name is created with a merged set of dependencies and properties.
All: All the datasources are merged together to create a single new merged datasource. The atoms within this datasource are created by merging the atoms from all the datasources. For atoms with the same name, a new atom with the same name is created but with a merged set of dependencies and properties.
Specify the selection for Create Subsystems for Datasources. If this option is selected the project is organized by datasources. As a result, if there are atoms with the same name in different datasources, they will be in separate partitions. If this option is not selected, the partitioning is done by the natural order of the input (file/directory structure for C/C++, package structure for Java etc.). In this case atoms with the same name are put into the same partition.
Select the files to be loaded in the top panel and click on Add Files. Click on Create Project to create the compound project.
Once you have created a project, you can save it by File –> Save or File –> Save As. The project is saved as an ldz file which is a compressed format.
You can update the project to add or remove sub-projects or to change its options from Project Properties.
