C/C++ with Clang using a Build Spec#
The information Lattix needs to create a project can be provided in a build specification file. This is an xml file that contains the required compile and link information. This is the preferred way for dealing with complex projects. Lattix tool LXBuild can be used to generate this file.
Creating the Build Spec file#
On Linux#
Run LXBuild and specify the command to build as an argument. For example:
lxbuild make
This command will generate a file named buildspec.xml which contains the specification of the build. It consists of units, corresponding to each link unit. Each unit contains the files and the options for compiling them. This file can be used to create a project in Lattix.
On Windows#
First generate a compile_commands.json using one of the many methods available.
You can then run:
lxbuild -j compile_commands.json
to generate a buildspec.xml file. This file can be used to create a project in Lattix.
Using Make build log#
Generate a log file from your make build. You can then run:
lxbuild -l <logfile>
to generate a buildspec.xml file. This file can be used to create a project in Lattix.
Using other build systems#
A variety of build systems have tools to help you generate a compile_commands.json compilation database.
You can then run:
lxbuild -j compile_commands.json
to generate a buildspec.xml file. This file can be used to create a project in Lattix.
Manually writing a build spec file#
A build spec file can be written manually, using the tags outlined below:
<buildspec dir=”dirname”> - outermost tag in the response file. The dir attribute allows you to specify the directory to use for relative path resolution. dirname is an absolute path or a path relative to the directory containing the build spec file. All relative file references in the buildspec are resolved relative to the path indicated by dirname. If dirname is not specified, relative paths are relative to the directory containing the build spec file.
<unit> - tag that describes a Unit. <unit> groups source files, much as a linker links compiled source files together. <unit> provides scoping that is used to resolve dependencies on multiply defined symbols. <unit> has one attribute, name, which typically corresponds to the name of a makefile.
<directory> - tag that describes a directory of source to be added to the project. The name attribute indicates the path to the directory. The recursive attribute (implied to be true) indicates that sources from subdirectories are to be added. The options attribute can be either merge or replace, defaulting to merge.
<exclude> - tag that is a child of <directory> whose attribute pattern indicates a pattern of file or directory to exclude from the build.
<file> - describes a source file. It has one attribute, name, that indicates the path of the source file to be compiled. The path can either be absolute, be relative to the name specified in the <unit> or <directory> or be relative to the path of the .ldclang file. <file> is child element <unit> and <directory>
<option> - indicates a switch passed to the compiler. It has one attribute, value, which indicates the switch. <option> can be used as a child of <buildspec>, <unit>, <directory>, or <file>.
Example#
<?xml version="1.0" encoding="ISO-8859-1"?>
<buildspec>
  <unit name="httpd-2.2.21" options="merge">
    <option value="-DWIN32"/>
    <directory name="C:\Lattix\Apache\httpd-2.2.21" recursive="true" options="merge"/>
  </unit>
</buildspec>
Further Infomation on LXBuild#
For more in depth usage information about LXBuild, please see LXBuild and LXBuild Internal Options.
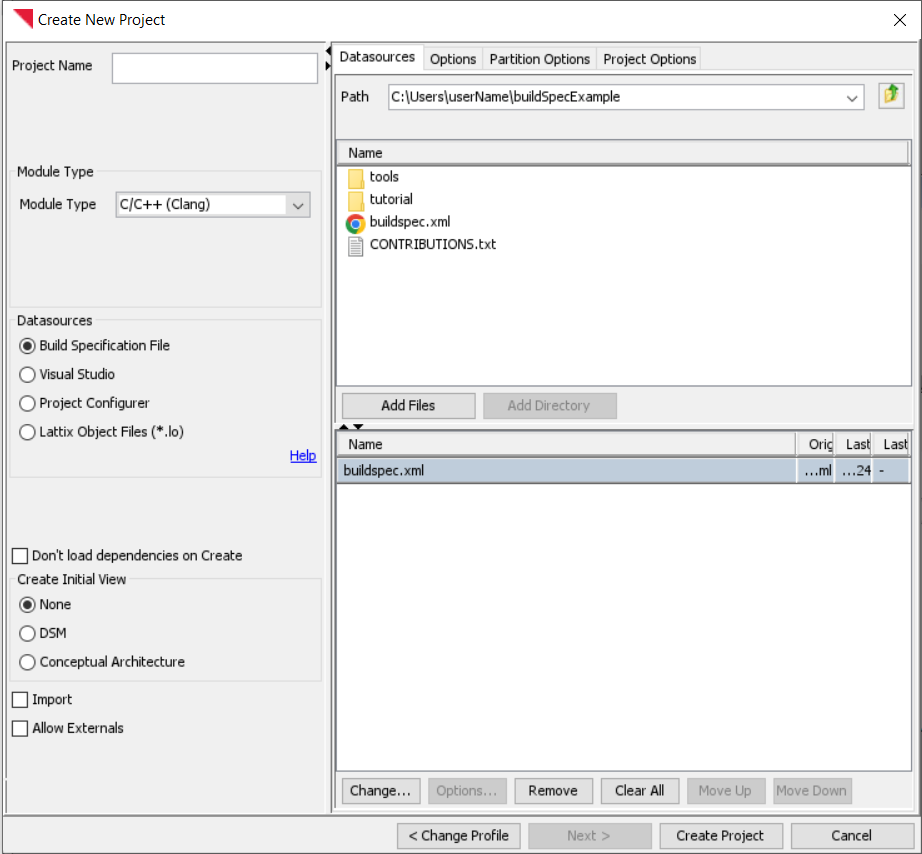
Creating a project#
Once you have created a build spec file, you can create a Lattix project by following these steps:
Select New Project from the File menu
Select either Embedded or All on the Profiles page and click Next
Select C/C++ (Clang) in the Module Type dropdown
Set Datasources to Build Specification File
Navigate to your build spec file, select it and click Add Files
Click on Create Project
Creating a clang project on the command line#
ldcupdate <NewProjectFile.ldz> -module:clang buildspec.xml
ldcupdate <NewProjectFile.ldz> -module:clang compile_commands.json
Check for Errors#
Check for errors by bringing up the Clang Reports using Reports->Clang Reports…->Diagnostics By File. The errors that cause analysis inaccuracies are typically from missing include files. Fix the errors and re-create (or update) the project. Note that you can specify additional include directories in the Options tab in the Create New Project dialog.
Hint 1: To minimize the time, remember that you can test by compiling just a single source file that is giving you errors. The Options tab on the Create New Project dialog has an section called Include files matching these names. Simple enter the full path name of the file and then only that file will be compiled.
Hint 2: You can specify any additional include directories in the Options tab on the Create New Project dialog using the section Include directories. You can also specify any additional compiler options using the Compiler Options section.