Lattix Architect User Interface#

The user interface allows you to load in multiple projects, each with multiple views. The Lattix Architect User Interface screen is divided into 6 areas:
Menu Bar: Each item on the Menu Bar can be pulled down to reveal a sub-menu. The action performed by the sub-menu item can depend on the current selection in the View Pane.
Tool Bar: Each icon on the tool bar can be clicked on to perform an action. Note that the action can be depend on the current selection in the View Pane.
Left Pane: The left pane contains the Navigator and the Repository. Select the Navigator or the Repository tabs on the left to bring up or hide the Navigator or the Repository tree.
Middle Pane (View Pane): Shows the Home or the Conceptual Architecture Diagram (CAD) or the Dependency Structure Matrix (DSM) view. Reports are also viewed in this pane.
Right Pane: Shows the context sensitive properties associated with the selection in the Middle Pane. Select the tabs on the right to bring up the appropriate property pane, such as Usage, Rules, Violations, etc.
Message Pane: The Message Pane is a text area where useful free form text information is generated. Users can copy text from this pane. You can bring up or hide the Message Pane using the Menu Item ().
Tool Bar Icons#
|
Create a New Project |
|
Open Lattix Repository Dialog Box in order to create new tracks, upload new snapshots and otherwise manage the repository |
|
Open a Lattix Project File |
|
Save Lattix Project to File |
|
Refresh Display |
|
Undo Last Action |
|
Redo the Last Action that was Undone |
|
Find Subsystem(s) in Project |
|
Cut Selected Subsystem(s) |
|
Paste Cut Subsystem(s) |
|
Paste Cut Subsystem(s) into a Subsystem |
|
Create a New Subsystem |
|
Delete Selected Subsystem(s) |
|
Move Selected Subsystem Down |
|
Move Selected Subsystem Up |
|
Expand Selected Subsystem One Level of Hierarchy |
|
Collapse Selected Subsystem One Level of Hierarchy |
|
Display Project Home (in the Middle Pane) |
|
Go to Find Issues Home |
|
Go to the Previous View and Selections |
|
Go the Next View and Selections |
|
From the adjacent pull down menu, choose and apply a Partitioning algorithm to the Selected Subsystem |
|
Toggle Cell Comment Indicator Display |
|
Toggle Cell CanUse-Rule Indicator |
|
Toggle Cell CannotUse-Rule Indicator |
|
Toggle Cell MustUse-Rule Indicator |
|
Toggle Cell Violation Indicator |
|
From the adjacent pull down menu, choose which lines to show in the CAD diagram |
|
Toggle Hidden Dependency Indicator |
|
Toggle - Change Cursor to CrossHair |
|
Toggle - Lock Properties Tab from Updating with Selection in Display Pane |
|
Toggle - Turn off Display Updates during Edits |


Home Pane#
The Home Pane displayed in the middle pane. It is displayed when a project is created or by going on the Home Icon in the Toolbar.
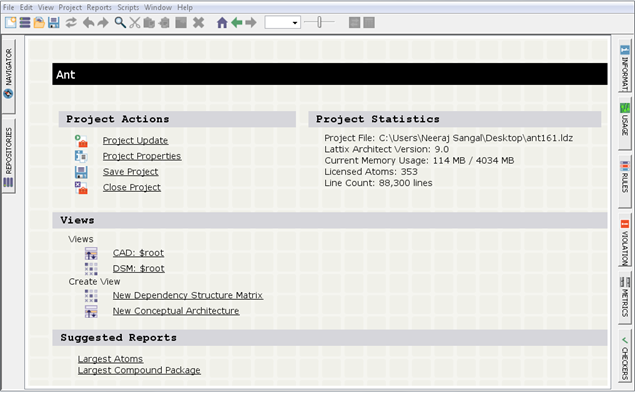
Home is divided into three sections that provide short cuts to some commonly used actions:
Project Section: Provides basic project actions and displays some basic information.
View Section: Shows the current set of Views and provides links for creating a new DSM or a CAD.
Reports Section: Provides links to run basic reports.
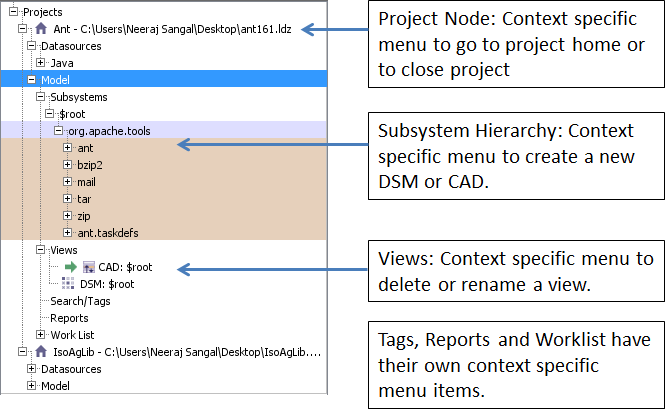
Navigator Pane#
The Navigator Pane is on the left. The Navigator tree shows the projects that have been loaded. The Navigator tree also shows Data Source, Subsystems, Views, Tags, Reports and Worklist for each project. Context specific menu items for each type of node in the tree can be brought up by selecting the node and right clicking on it.
To select a Project home page, a View or a report in the Navigator, double-click on the item. A yellow arrow will indicate the item being displayed.
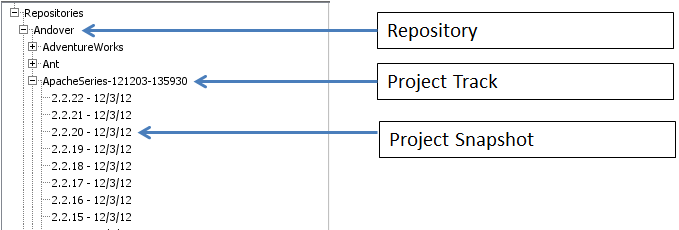
Repository Pane#
The Repository Pane is on the left. Lattix Architect can connect to multiple Repositories. Each Repository can have multiple Project Tracks. Each Project Track can have any number of Project Snapshots. Double clicking on a snapshot loads the project.
Usage Property Pane#
The Usage pane on the right is one of the most useful panels in Lattix Architect. It enables a very detailed analysis and drill-down of dependencies. The Usage tab contains two panes - a Used By pane at the top and a Uses pane at the bottom. These two tabs are organized as a tree hierarchy though you can switch the display to a tabular mode by clicking on the icon at the upper left corner of each pane. The leaf level of the tree in the Uses pane shows the kind of dependency.
When you select a cell in the DSM or a line in CAD: The Used By pane lists the (source/consumer) subsystems that make use of the (target/provider) subsystems listed in the Uses pane. To drill down further within the context of the cell: Select a subsystem in the Used By pane and the Uses pane then shows only the subsystems that the selected subsystem uses. You can also drill down from the Used By pane by selecting a subsystem on that pane and the Uses pane lists the subsystems that make use of the selected subsystem.
When you select a subsystem in the DSM or CAD: The Used By pane lists all the subsystems that use the selected subsystem in the row header. The Uses pane shows all the subsystems that the selected subsystem uses; this list also includes all the external dependencies. You can drill down further within the context of the cell: Select a subsystem in the Used By pane and the Uses pane then shows everything that the selected subsystem uses. You can also drill down from the Used By pane by selecting a subsystem on that pane and the Uses pane lists the subsystems that make use of the selected subsystem.
When you select $root: The Used By pane shows the decomposition hierarchy. The Uses pane shows all the external subsystems. You can drill down further by selecting an external subsystem in the Uses pane and the Used By pane will list all the users of the selected external dependency.
You can do a variety of operations by selecting a subsystem and right clicking to bring up the pop-up menu on either pane in the Usage tab.
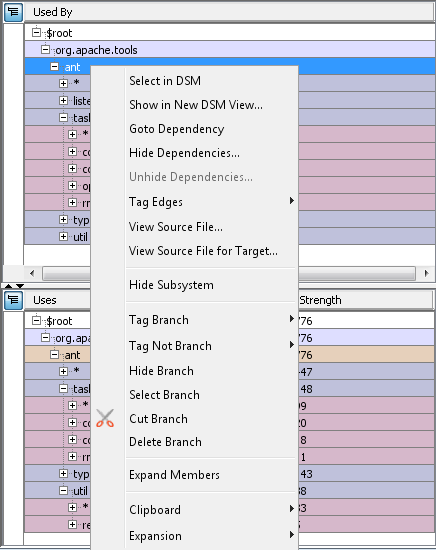
Note that some of the options are greyed out if they aren’t applicable at that selected node. For instance, the View Source File… menu item is enabled if the selected node is a single source element (such as a file, class, method etc). The Clipboard sub-menus enable you to copy data into the clipboard so that it can be pasted into editor or spreadsheet applications.
Configuring Preferences#
You can configure many of the default settings to tailor Lattix Architect to your environment. Bring up the Preferences Dialog through .
Grid Appearance#
Row Header Style#
The default DSM display rotates the parent on its side when it is expanded. You can use this option to organize the display as a Tree.
Display as Multi Level: Expanded row headers are rotated, and appear to the left of their children
Display as Tree: Expanded row headers appear above their children, like an “outline”
Column Header Style#
The default shows both the subsystem number and name in the column header. You can turn off the display of the column header name.
Show Text: Display the Text in the column headers
Dependency Mark Orientation#
By default, the dependencies are read down columns (A –> uses –> B has A in the Column and B in the row). You can change this so that you read dependencies across rows (A –> uses –> B, will have A in the Row and B in the Column).
Across Rows: Read the dependencies across the rows
Down Columns: Read the dependencies down the columns
Subsystem Ordering#
Configure Ordering.
Provides over Consumes: Provider subsystems will be at the bottom
Consumes over Provides: Provider subsystems will be at the top
The default is “Consumes over Provides”. This means that subsystems that provide to others are at the bottom. This corresponds to a stacked or layered view of the architecture. The alternative is “Provides over Consumes”. This is useful for a task or process oriented view, where tasks are sequenced in time, and subsequent tasks depend on previous tasks.
DSM Cells#
Configure Cells in the Matrix
Show Subsystem Borders: When a subsystem is expanded hierarchically, a border is generated around the children to make it easier to discern.
Show Dependency Strength: You can turn this option OFF to display the classic ‘X’ notation for dependency strength.
Show Dependency Colors in DSM: Turn on to have DSM cells colored according to the dependency type(s) the cell corresponds to. Colors can be customised in the Modules -> <Module> Defaults -> Dependency Colors section of the preferences, or in each project’s properties.
DSM Partitioning#
Recursive Partitioning: When you choose to partition a DSM, you can do so recursively (i.e. partition every subsystem within the system you have selected) or non-recursively (i.e. only partition the top-level members of the system you have selected). If the Recursive Partitioning button is ticked, recursive partitioning will be the default option for all future projects created. Note that if you change your mind after having created a project, recursive partitioning can be turned off for a project either via the project properties (Project –> Project Properties –> Display –> Recursive Partitioning) or by choosing the drop-down arrow adjacent to the Partitioning toolbar icon, choosing “…” and deselecting “Recursive” in the dialog.
Show Virtual Subsystem Borders: Toggle to turn off the display of virtual subsystem borders.
Consider Atom “Kind” When Doing Alphabetize/Reverse Alphabetize Partitioning: Choose whether alphabetize partitioning will group atoms by kind and then alphabetize or just alphabetize
DSM Display Names#
Display simple names: Choose whether to display the simplest names possible in the DSM or include full details such as location in the name
Header Expansion Warning Limit#
When you click to display the children of a subsystem, a warning will be produced if the number of children exceeds the limit (default is 200). This is typically used to handle the case where a subsystem is flat and has thousands of children.
Font Size#
Choose which font size Lattix will use. Changing the setting will prompt a redraw of the Lattix GUI. If you require a larger font size than is available in the drop-down, please contact support@lattix.com
Grid Colors#
Configure various color settings for cells when they are selected, disabled etc.
Line Colors#
Configure the colors of line in the Conceptual Architecture Diagram (CAD) based on whether they are going up, down, right or left.
Cell Indicator Colors#
Configure the color for the various indicators on a cell such as Rule Violation, Can-Use Rule, Cannot-Use Rule and Cell Comment.
Heatmap Colors#
Configure the colors for Pass, Warning and Error in the Heatmap.
Subsystem Appearance#
Set the colors for various levels of the hierarchy.
External Viewer Configuration#
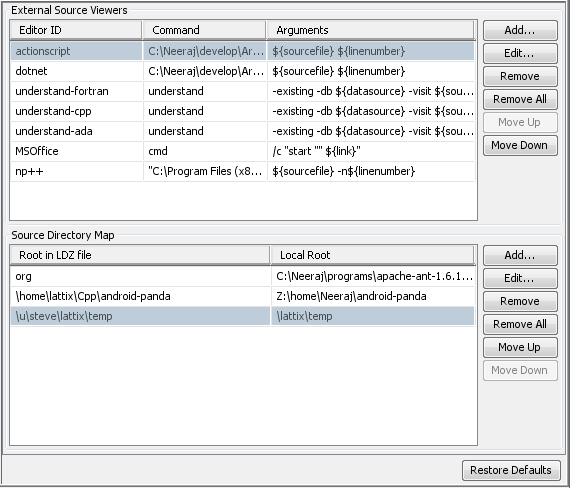
External Source Viewers#
Set the various external editors or viewers that you want to use in conjunction with Lattix Architect. These External Viewers must then be configured for the module that you are using.
The following atom or dependency properties can be passed to an external viewer:
${sourcefile}
${linenumber}
${link}For instance, VSCode can be configured as follows:
Add Editor Id as
vscodeAdd Command as
codeAdd Arguments as
-g ${sourcefile}:${linenumber}This assumes that the “code” program is in your path. If not you can change the code to the full path like /usr/local/bin/code
For instance, Notepad++ can be configured as follows:
Add Editor Id as
Notepad++Add Command as
C:\\notepad++\\ansi\\notepad++.exeAdd Arguments as
${sourcefile} -n${linenumber}With this configuration, Notepad++ will come up positioned on the linenumber of a dependency when user selects the View Source menu item.
You can also configure Microsoft Office to be invoked from the ‘link’ property in the Info pane as follows:
Add Editor Id as
CmdAdd Command as
cmdAdd Arguments as
/c "start ${link}"Additional examples for Eclipse, Visual Studio and others are provided in the FAQ.
Source Directory Map#
The Lattix Project File will often contain the source file for an element. This is typically the value for the machine on which the project is created. Others may have copies of the source in a different directory on their machine. This map allows the directory to be mapped so that Lattix looks for the file in other directories based on the map. Mapping across Windows and Linux can be done.
Dependency Options#
Dependency Strength Type#
Knowledge-Based Subsystem Dependency Strength: If two subsystems have dependencies between each other, the strength is the count of the children of the subsystems that have dependencies.
Knowledge-Based Dependency Strength: Dependency between two subsystems is the aggregation of dependencies between their children with the provision that the strength of dependency between two leaf subsystems is always taken to be one.
Usage Based Dependency Strength: Dependency between two subsystems is the aggregation of dependencies between their children.
Identity Style#
None: A ‘.’ is placed in the identity diagonal. This corresponds to the classic notation of DSMs.
Percent: The cell in the diagonal denotes the percentage of atoms within that partition and its descendants. This helps users quickly identify and focus on large subsystems.
Strength: The cell in the diagonal denotes the strength of the dependencies within the descendants of the subsystem.
Dependency Terminology#
Source/Target: When A –> uses –> B, A is referred to as the Source and B is referred to as the Target
Consumer/Provider: When A –> uses –> B, A is referred to as the Consumer and B is referred to as the Provider
Logging#
You can set logging to Informational or Debug. Logging messages appear in the Message Pane at the bottom.
Scripting (directories)#
Script Directories#
This option is useful when installing a new script, see: Installing a script
This option allows you to configure directories where you want to maintain scripts. By default, scripts are kept in the scripts directory where Lattix Architect is installed. If users want to write and maintain their own scripts, they can designate the directories where their scripts will be kept.
Checkers#
Checker Issue Limit#
Configure the issue limit for Checkers. This prevents the checkers from running too long.
Metrics#
Configure aspects of metrics calculations and display. In , these will only set the defaults. Each project will inherit the defaults and allow you to change them on a project basis via the dialog.
Tarjan Recursion Limit#
This option is described here Limits on Project Size and Overcoming the Limit. The setting here is for the property
lattix.dsmtools.max_tarjanwhich is described in that section.
Always Compute Metrics#
This option is also described here Limits on Project Size and Overcoming the Limit. The setting here is for the property
lattix.metrics.alwaysComputeMetrics
Display Metrics on Information Panel#
When this option is on, then metrics checked in the Heatmap Metrics will also display in the Information Panel.
Heatmap Metrics#
Check the metrics you wish to appear in the Heatmap and the Information Panel (If above option is checked). - Metric: The name of the metric. - Warning: The threshold value that triggers a “Warning” indicator in the heatmap. - Fail: The threshold value that triggers a “Fail” indicator in the heatmap.
Statistics#
Enable Statistics Collection#
Enable or disable Statistics collection. Statistics are collected by sending https requests to a Lattix statistics collector. Lattix collects statistics on the following events:
Application Start/stop
Project Load/Save/Update
New View created
Report generated
Checker run
Script run
Configuring Module Defaults#
Configure the default set of rules for each module.
Configure the default for module specific options of each module.
Configure the default External Editor. The default External Editor must already be specified as an External Viewer.