Visual Studio Integration#
Lattix Application Suite can be integrated into your Visual Studio development environment.
You can download and install the Visual Studio Extension for later versions of Visual Studio (2015+). You can also manually configure Architect and Command Line applications into older versions of Visual Studio easily.
Visual Studio Extension#
Lattix Extension for Visual Studio#
You can download the Lattix plugin for Visual Studio from the Visual Studio Marketplace. It works with Visual Studio 2015 and higher versions. The extension on allows you to run Architect directly on your current solution from within Visual Studio. It also allows you to update Lattix projects and verify rules upon every build.
Installing the extension#
Download the extension file (VSLattixArchitect.vsix) and run it to install.
The Studio Tools menu will show two new Lattix related menu items.

Select the “Tools –> Options” menu and select Lattix Architect –> Settings
Please ensure that the “Use Most Recent Lattix Version” checkbox is turned on. Click the “Check License” button. After a few seconds, a dialog should appear that tells you what Lattix Licenses are available on your pc. The check utilizes the default install folder. If the Check License fails to run or informs you that you do not have Lattix Installed, uncheck the “Use Most Recent Lattix Version” and enter the actual Lattix Install Folder in the text box.

Using the extension#
The Extension adds two menu items to the Tools menu:
Add Lattix Post Build Update
Launch Lattix Architect For Solution
Add Lattix Post Build Update#
The “Add Lattix Post Build Update” menu command will add a “post build” event handler to the solution. After every successful build, the Lattix command ldcupdate will be run on the solution. This will keep your Lattix Project up to date.
The output from the ldcupdate command will appear in the build console window. You can remove the “post build” event handler by selecting the menu command “Remove Lattix Post Build Update”
Launch Lattix Architect For Solution#
The “Launch Lattix Architect For Solution” menu command will run the “lattixarchitect” application on the current solution. A new Lattix window will appear and the current solution will be compiled by Lattix and displayed.
Using the Studio Editor#
View Source Integration#
Architect gathers source file and line number information while building a model for your system. View Source allows you to see the source code for a dependency or an element definition. If Visual Studio is your IDE of choice, you can use it as your target editor for the View Source functionality.
You can view the source for an element or a dependency by right clicking on the element and selecting the View Source menu item. View Source is configured on a per module basis. The first time you use View Source, a dialog appears asking you to configure the editor to use for View Source:
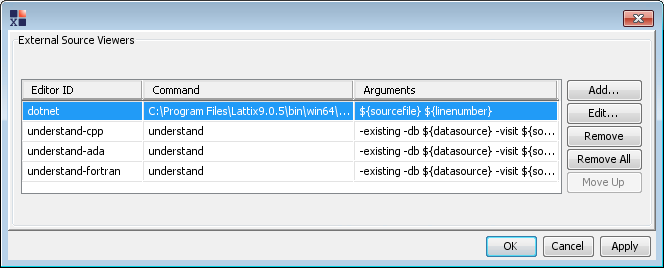
Selecting the dotnet choice will make Visual Studio the editor for viewing source for elements and dependencies in the model.
Notes
Depending on how you have your computer configured, using Visual Studio may not cause it to become the active window. However, in this event, Visual Studio will be flashing in the Windows task bar. Click it to see the source.
The .NET module uses PDB files to determine source file and line number information for .NET assemblies. Refer to the .NET module documentation for details on this functionality.
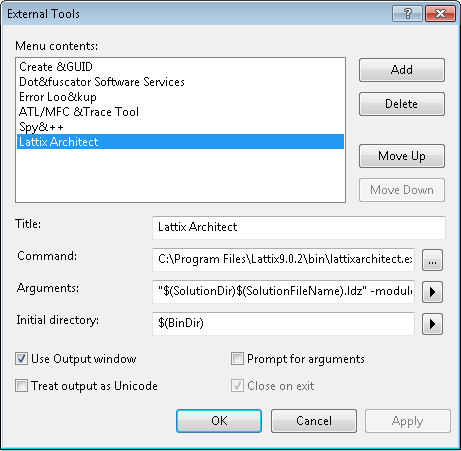
Manual Configuration#
Enter the path to the Lattix Architect executable into the Command field
Enter the following in the Arguments field: “$(SolutionDir)$(SolutionFileName).ldz” -module:dotnet “exe:$(BinDir)[.exe]” “dll:$(BinDir)[.dll]”
Set the Intial Directory to the Bin directory (i.e. $(BinDir))
Enter the path to the Lattix Architect executable into the Command field
Enter the following in the Arguments field: “$(SolutionDir)$(SolutionFileName).ldz” -module:clang vs-sln-file:sln_name=$(SolutionDir)$(SolutionFileName),sln_cfg=$(BinDir)
Set the Intial Directory to the Bin directory (i.e. $(BinDir))

After completing the setup, just click on a project in your VS2010 and call your new External Tool. Lattix Architect will start and generate (or update) a project for your C++ project.
Command Line Integration#
If you have an LDC license, you can automatically update your Lattix models as part of your Visual Studio build process. In Visual Studio, select Properties from the bottom of the Project menu:
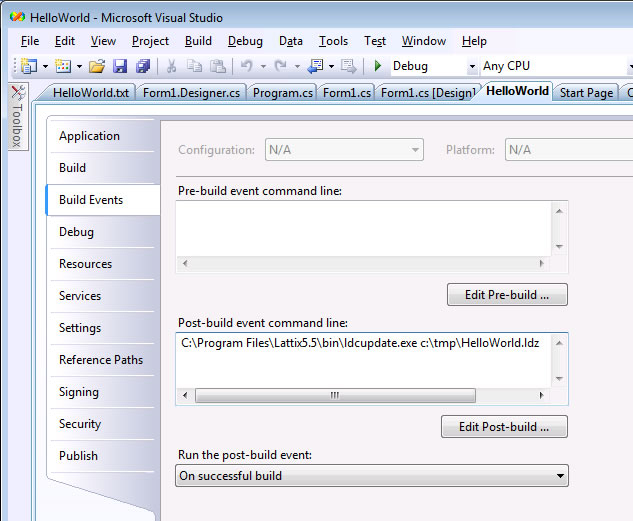
The Post-build event command line uses ldcupdate.exe to update the model (c:tmpHelloWorld.ldz) associated with this project.